User GuideThe Mobile Apps
LockOnMe is currently available on Android & Wear OS as a mobile app – you can download it from the Play Store![]() .
.
The Dashboard, starting point of the app, gives access to the following areas: Position Service, Connected Target, Tracking Management System, Display and Extras.
The sections below also include a dedicated area on DTMF, which is a special transmission functionality.Your device has to be able to determine your precise position (using GPS or sometimes only WiFi) in order to make relative positioning work.
Getting a precise position from your device can be constraining: cell-tower / GSM localisation is not accurate enough, so you will have to lock on a GPS signal (mainly for outdoor use, or close to a window), or connect to a WiFi network (this method may or may not provide the required accuracy).
The Dashboard displays the status of the user's Position Service – it should be ACTIVE:

If the device hasn't got a precise position for more than 30 seconds, a countdown will be displayed, at the end of which an alert will be triggered.
The Info button leads to a screen providing more detailed information:
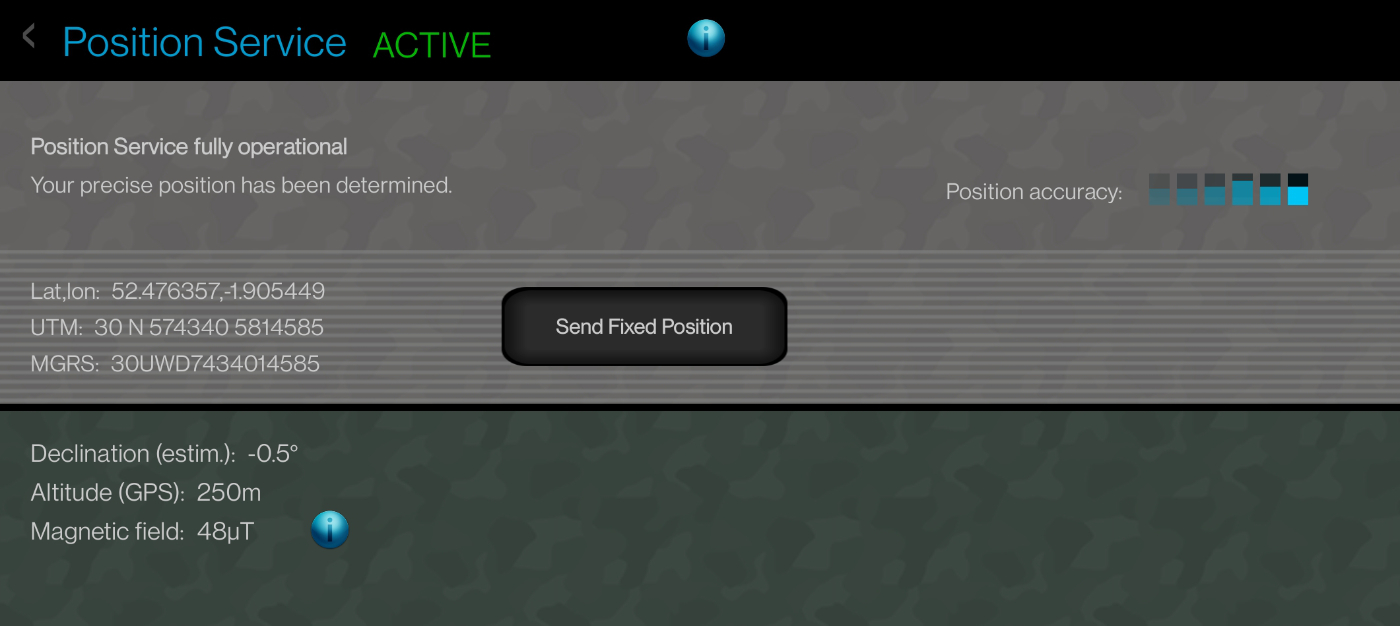
Beside the Position Service status text, vertical bars give an indication of the position accuracy obtained by the user's device over time.
Below the status text, the users' latest geographic and Cartesian coordinates are given in latitude & longitude (decimal degrees), UTM and MGRS coordinate systems – based on WGS84.
On this screen, users have the option to share their latitude and longitude as a "one-off" fixed position, by SMS, email, WhatsApp or DTMF signaling (in turn, DTMF signals can be imported – see section F. DTMF for more details).
The URL contained in the message can be opened either in a web browser (leading to the tracking console), or in the LockOnMe Android app if it is installed on the recipient's device.
Towards the bottom, the declination is estimated by Android according to the geographic coordinates obtained by the device, using Android's own space & time algorithm. When comparing to other algorithms, a greater variation in values may occur at high latitudes and/or altitudes.
The figure indicates the declination of the horizontal component of the magnetic field from true north, in degrees – by convention, positive means the magnetic field is rotated east that much from true north.
The altitude is obtained by GPS, based on the WGS84 reference ellipsoid (and not from the geoid).
The figure is therefore inaccurate, insofar as the reference ellipsoid that approximates the earth's surface may be above or below the actual sea level. Differences in height between the geoid's Mean Sea Level (MSL) and reference ellipsoid range from roughly -100 to +100 meters.
More info: Mean Sea Level, GPS, and the Geoid.
The magnetic field is measured by the device's sensor.
When you get close to metal or other magnetic sources, including when charging your device, interference will disrupt its magnetic orientation, thereby affecting the compass. As a result, you may be prompted to perform a recalibration.
The Connection button on the Dashboard opens up the following screen:

Here you can connect to your own target, a prerequisite to being able to 1) create Points Of Interest (POIs) assigned to your target, and 2) broadcast your live location.
To connect to a target, click the Connect button and fill in the fields as shown below:

You can have as many Target IDs as you want, and also as many Tracking Codes per Target ID as you want. Each Target ID is unique, protected by the Target PWD.
IMPORTANT: Since LockOnMe does not require user accounts or email addresses, losing the Target PWD would mean losing the ability to connect to the related Target ID forever.
You can then either keep your target details to yourself, only to store and retrieve your POIs, or share them with whoever you want – which may happen to be everyone (in which case you could share your target details very broadly, like on social media).
Note that you don't have to approve following/tracking requests.
The Share Target Details button prepares a template message with your Target ID & Tracking Code to share by SMS, email or over WhatsApp.
The URL contained in the message can be opened either in a web browser (leading to the WTC), or in the LockOnMe Android app if it is installed on the recipient's device.
You can also generate a DTMF signal with your target details, for transmission via a radio transceiver; your recipients' LockOnMe app would then detect the DTMF signal and import your target details (see section F. DTMF for more details).
1) Points Of Interest (POIs)
POIs are essentially fixed positions that are assigned to a target. They can have a special icon, a note as well as an image URL. They are created in the Map view (more on them in section D. Display / Map).
Once connected to your target, its existing POIs will be displayed at the bottom, if any:
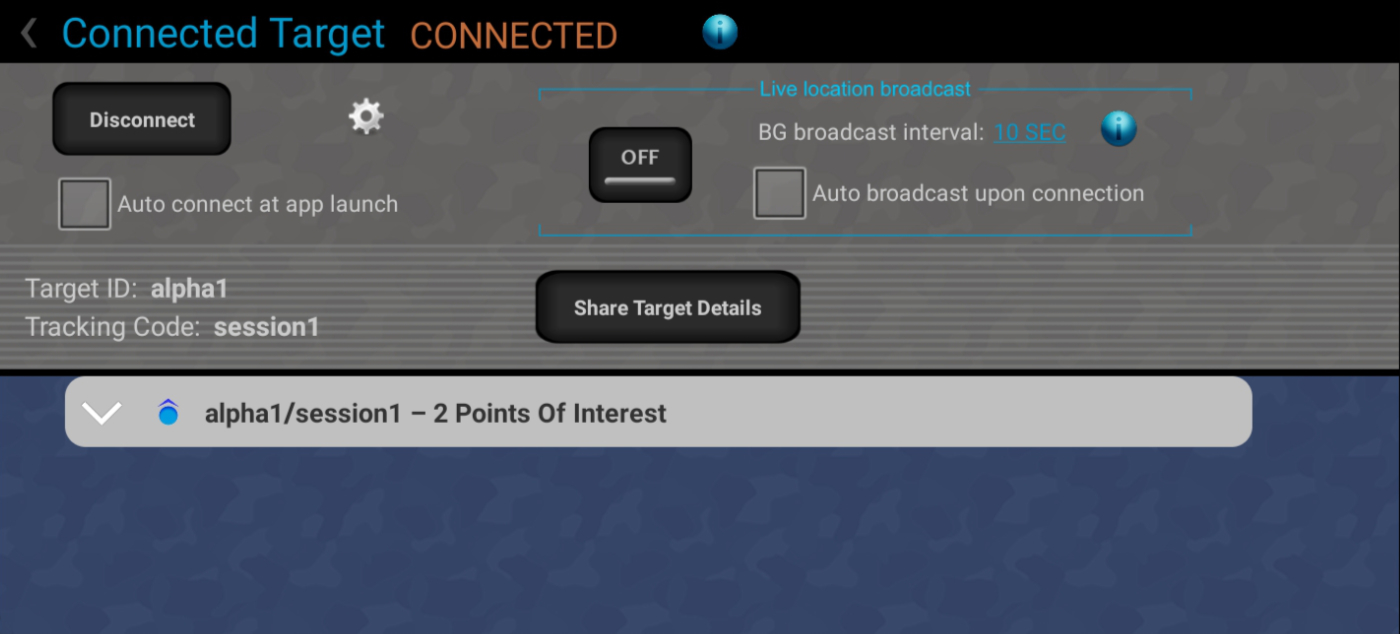
Expanded view (more info on its contents in section C. Tracking Management System):

2) Location broadcast
Once connected to your target, the live location broadcast ON/OFF button gets enabled:

After pressing that switch button, LockOnMe will start sending your geographic coordinates to the server every 3 seconds, until you stop the broadcast.
If you press the Home button on your device or turn off your screen, LockOnMe will continue broadcasting your location in the background – and a notification will keep showing on your device. You can amend the background broadcast interval in order to save on battery (the new interval will be applied once LockOnMe has run in the background for 30 seconds).
A tickbox gives you the option to directly start broadcasting when connecting to a target, which itself can be automatically triggered when the app is launched, by using the relevant tickbox.
Those with whom you share your target details (Target ID & Tracking Code) will be able to view your latest transmitted location, be it in real time or not; your latest location broadcast will persist in the database, as it may help to find you in case of emergency if your device becomes out of order (unless you decide to clear it in the Target Configuration dialog).
--Once connected to your target, the config symbol  gets enabled – it opens up the following dialog:
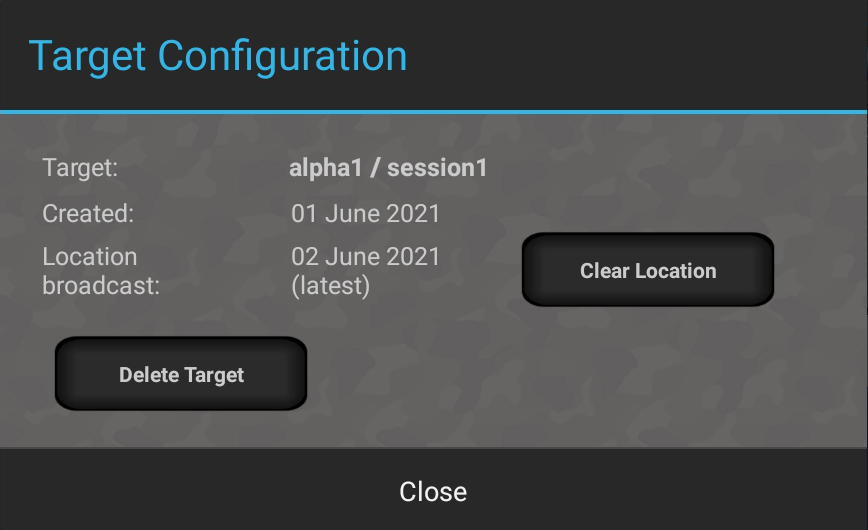
The Clear Location button clears the location recorded on the database. It is disabled when live location broadcast is ON.
The Delete Target button wipes out the target forever; it will disappear from the database table and so no longer exist.
Accessible via the Tracking button on the Dashboard, the TMS screen exposes your current list of tracking items, which can also be displayed on a map or radar.
If you are already connected to a target, and that target has at least one POI, it will show up like this:
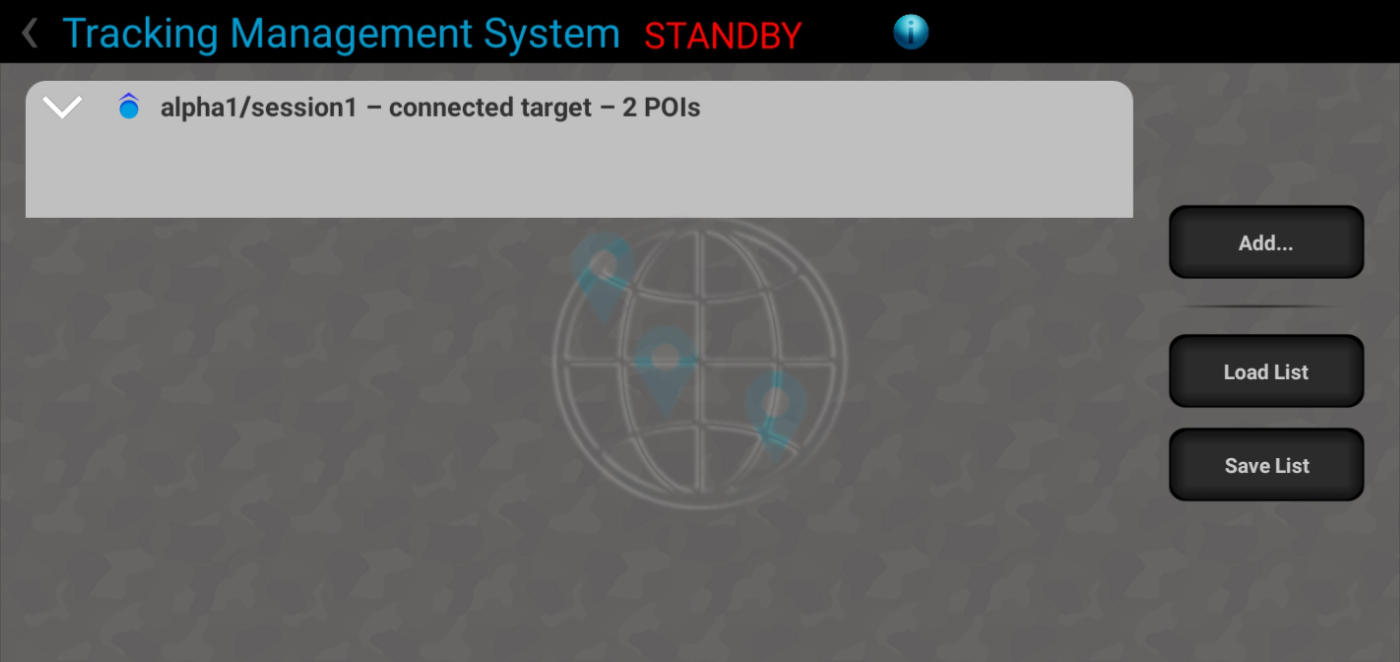
In order to add a tracking item, press on Add... – which opens up the following menu:
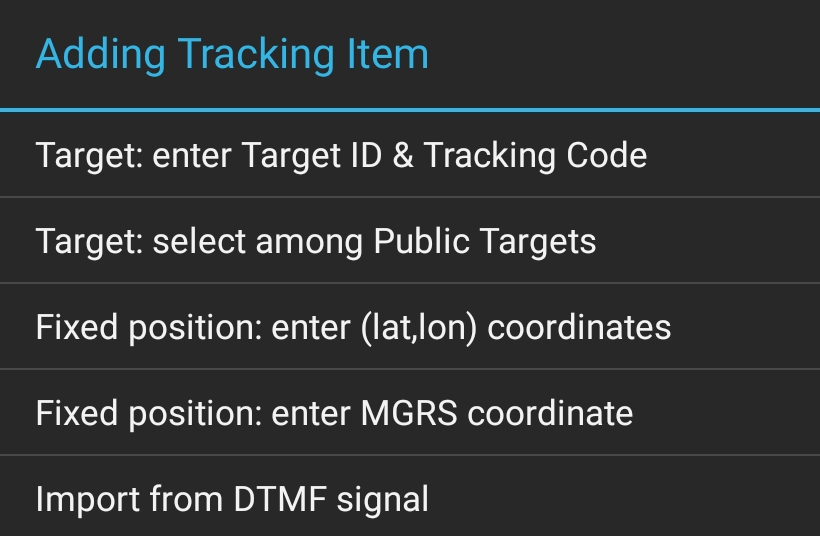
- Target: enter Target ID & Tracking Code lets you add a target to track, so as to view its (live) location and/or POIs:
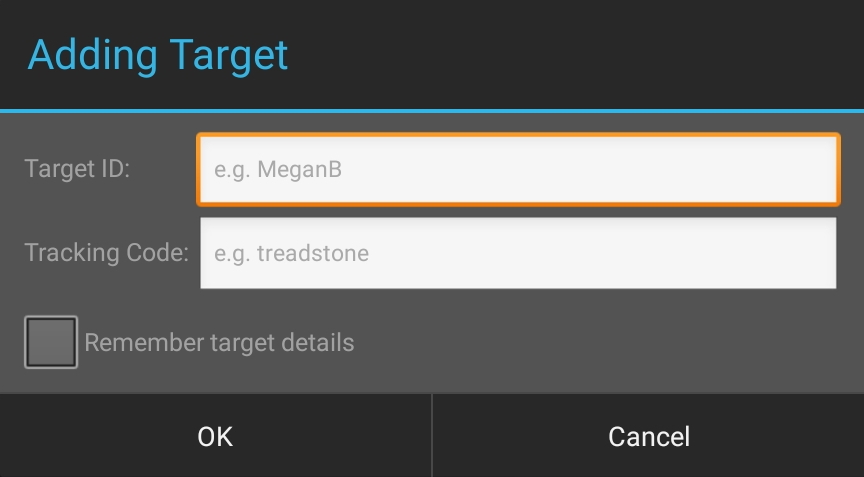
The target's location and POIs will be retrieved from the server every 3 seconds; the location is updated live provided that the target's user broadcasts it at the same time – in any case, its latest broadcast location will be downloaded, if there is any.
Once added, the target will appear in the target list, with information provided on distance and elapsed time since latest location broadcast (if any), plus any associated POI (press on the target area to reveal them, if any):
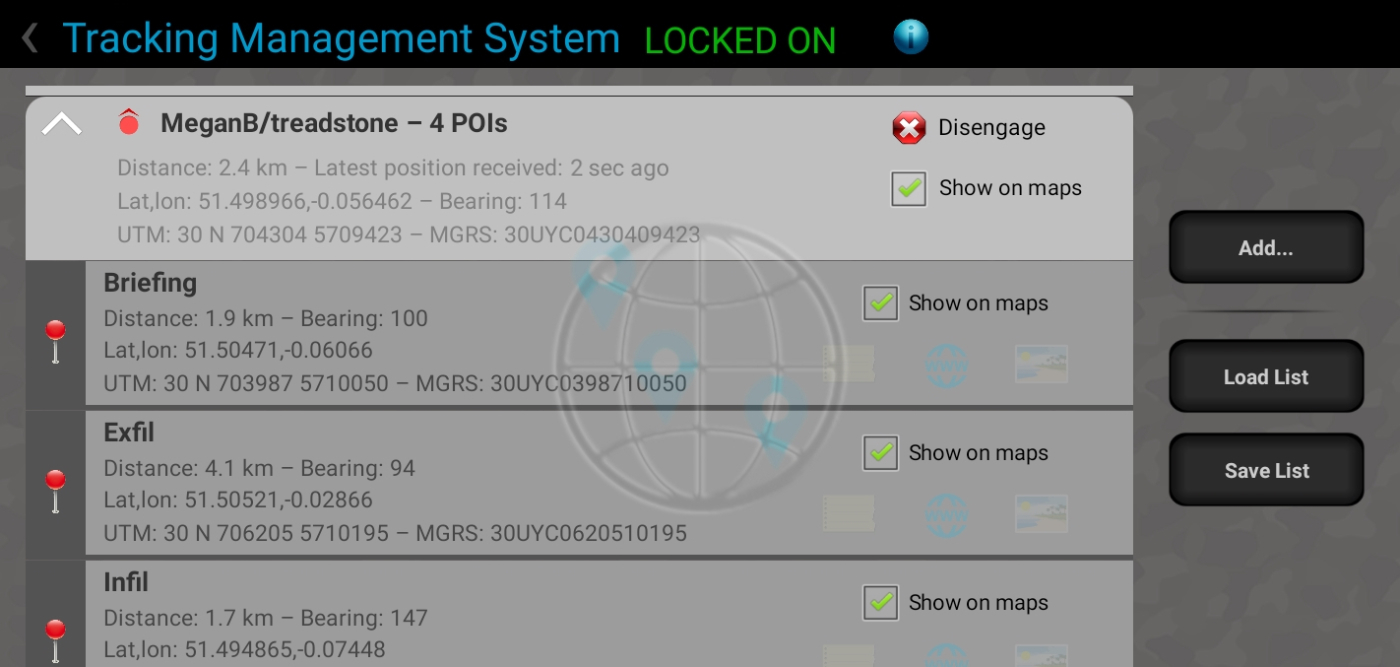
- Target: select among Public Targets presents you with a public list of existing targets which are openly available for tracking. See lockon.me/publictargets
 for more details.
- Fixed position: enter (lat,lon) coordinates lets you enter a position's latitude & longitude coordinates, expressed in decimal degrees (based on WGS84). The resulting position will appear as such:
The coordinates displayed are based on WGS84.

- Fixed position: enter MGRS coordinate lets you enter a position's MGRS grid reference (based on WGS84), with a precision level of 1 m required.
- Import from DTMF signal opens up the DTMF detection screen, which lets you detect a DTMF signal generated by a user's LockOnMe app. This enables you to import target details or fixed positions transmitted by the other user. See section F. DTMF for more details.
- You can load and save tracking lists via the buttons on the right:
The lists are saved on the device's internal database, and so are accessible offline.Tip: You can save fixed positions or the POIs of a target this way, and then access them offline at will; to be displayed on an offline radar - dispensing with the need to have internet access in the field.
- The check box on the right of most items enables to show|hide these items on the map & radars. This may be particularly useful for radars, in order to hide the items that are too close to the user's position, so as to focus on the farther ones (otherwise the close items would pile up at the origin when using a large scale for display):

- In the case of POI items, highlighted note, website and picture icons indicate the presence of embedded elements; click on the respective icons to display them.
- Long-pressing on any item from the list will offer a contextual choice of actions, such as sharing target details, sending a fixed position via DTMF (see section F. DTMF), or assigning an item as a POI to your connected target. Use this last method to add a POI based on latitude & longitude coordinates for example: first add the fixed position, and then assign it to your connected target.
The Display button on the Dashboard offers a choice of maps and radars to view positions and POIs.
Map
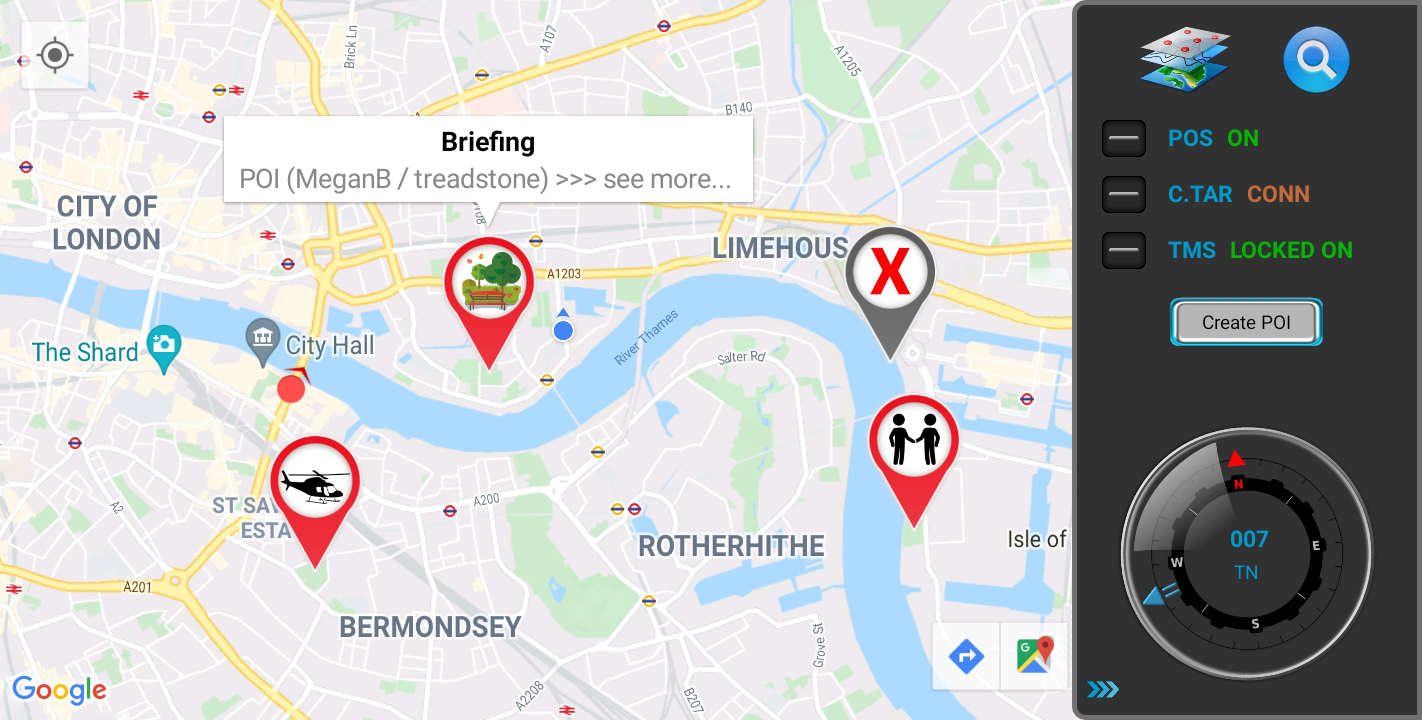
Legend:
 | Position of tracked target – arrow indicates orientation of target's device |
| POI attached to connected target / tactical POI equivalent | |
| POI belonging to a tracked target / tactical POI equivalent | |
 | Fixed position |
 | Fixed user position (shared from mobile app) |
The magnifying glass icon in the top right-hand corner enables you to search for a specific location (textual search).
The layers button on its left is for switching between map styles.
The compass at the bottom either indicates true north (TN) or magnetic north (MN) – the latter in case the device fails to determine the declination from your location.
The bearing to a marker (position or POI) that you selected on the map would be indicated by a blue arrow: 
Pressing on the Info Window that pops up when clicking on a POI offers an expanded view:
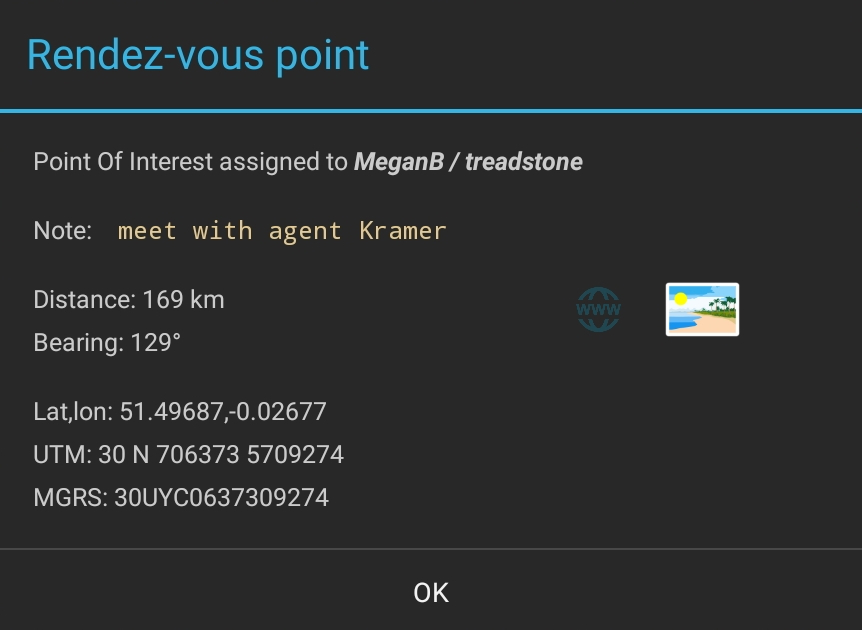
If the picture icon is highlighted, such as in the example above, the POI has an image assigned to it; click on the icon to view it. Same for the website icon next to it.
The coordinates displayed are based on WGS84.
There is a button to create a Point Of Interest, which would belong to your connected target. You can select an icon, add a note, website, as well as an image URL (you cannot attach an image stored on your device; it has to be stored online).
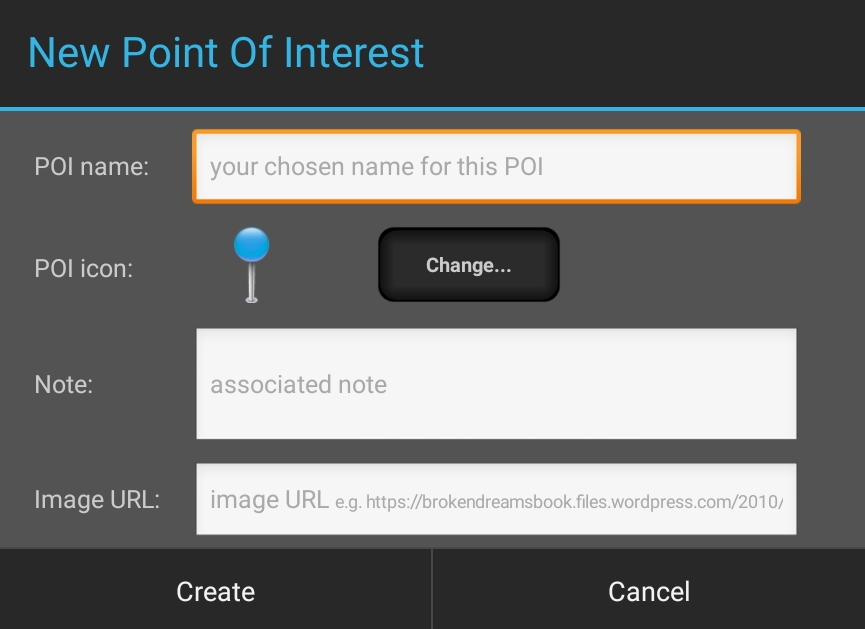
The people tracking you live will see your new POI as soon as it is created.
Marine Radar
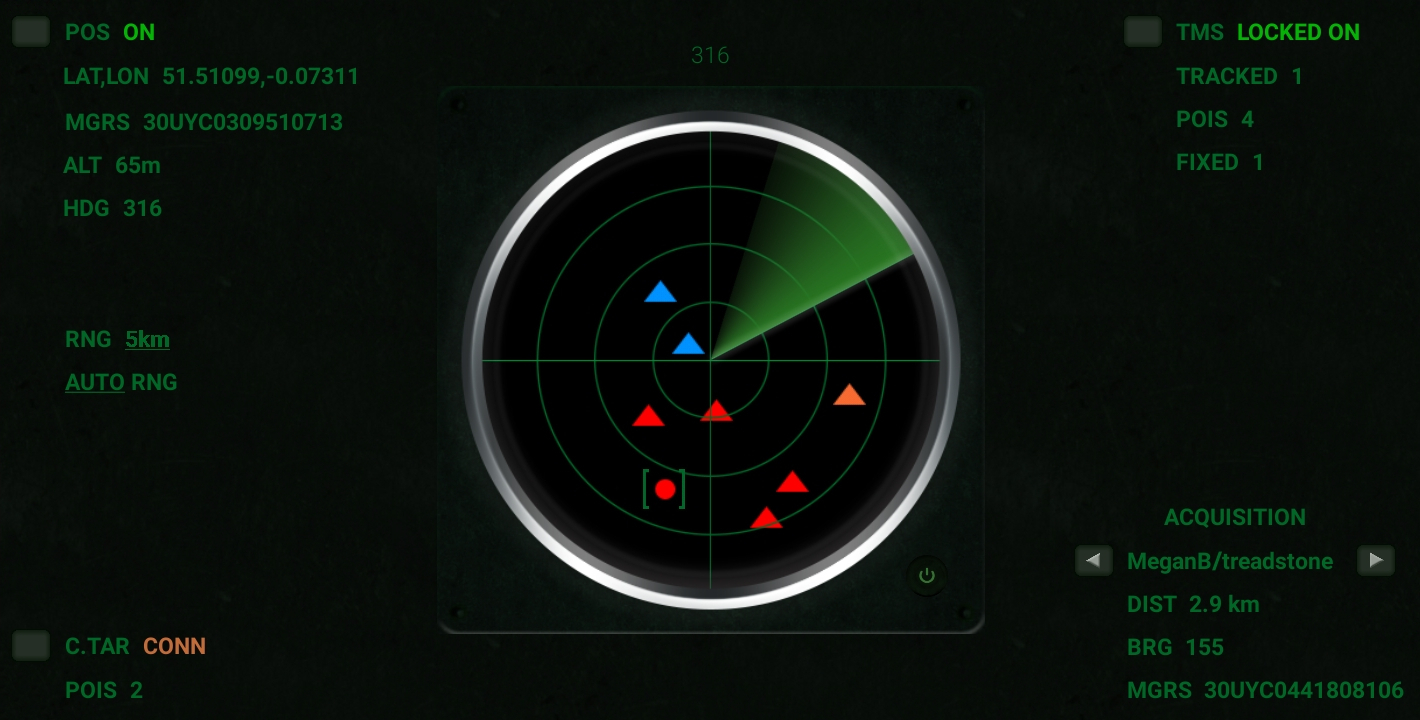
Target positions appear as red circles, their POIs as red triangles, your connected target's POIs as blue triangles, fixed positions as orange triangles and fixed user positions (which were shared from a mobile app) as purple triangles.
The range is automatically determined when launching the radar, according to the distance to the farthest tracking item (=> AUTO RNG); you can override it by pressing on the range fields (=> MAN RNG, standing for manual).
On the radar, the range is represented by the radius of the largest ring.
Tip: If you find that a bunch of markers are stacking up at the origin, while others are spread out, you can either decrease the range so as to focus on the markers that are closer to you, or go to the Tracking screen and un-check the display of the farther items.
The ACQUISITION section in the bottom right-hand corner provides information on tracking items – if any available.
Note that the Position Service, Connected Target and Tracking Management System screens are all directly accessible from the Marine Radar, via their respective buttons.
The coordinates displayed are based on WGS84.
Motion Tracker (inspired by the movie Aliens)
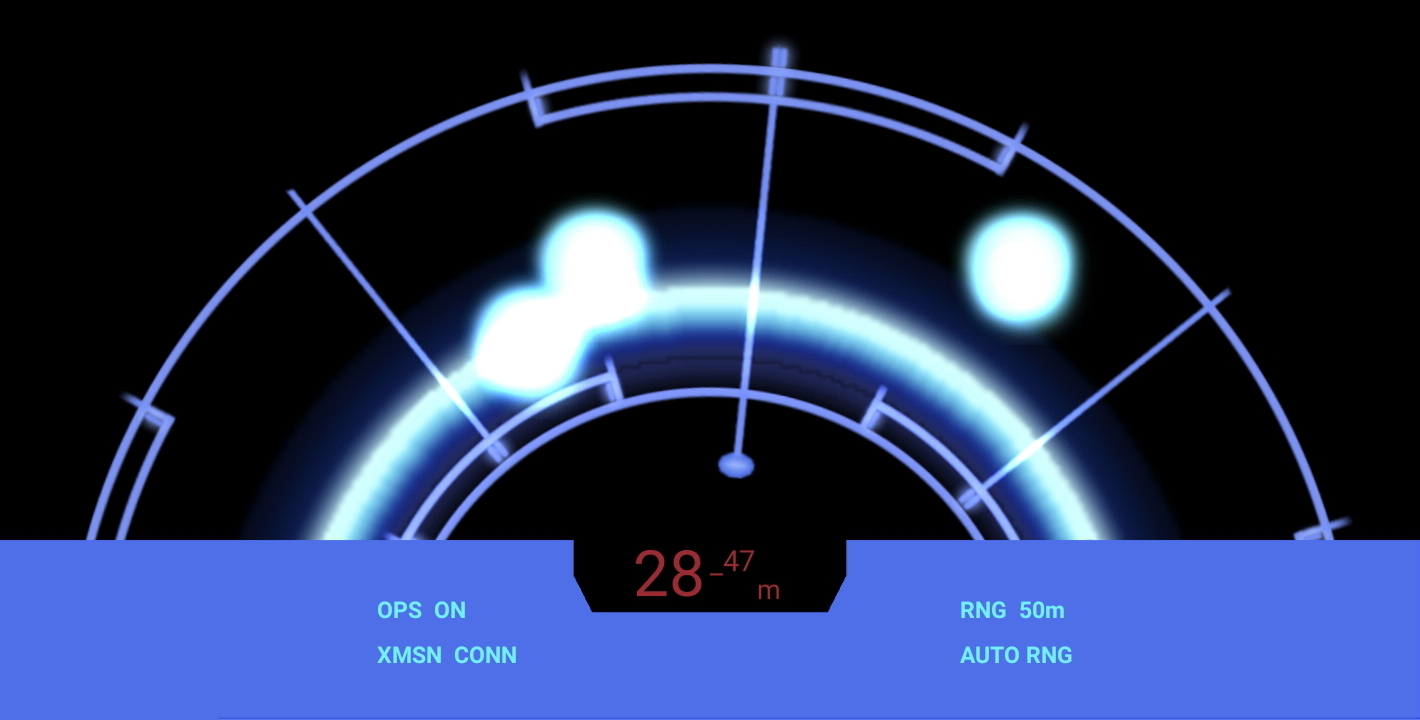
When you deploy the Motion Tracker, the range is automatically determined according to the distance to the closest target; you can override it by pressing on the range-related text fields.
Tip: You may not want to display certain targets' positions or POIs on this screen (as you may want to focus on just one item, or at least ignore the "known" elements...), in which case you can go to the Tracking screen and un-check the display of particular items.
Compass
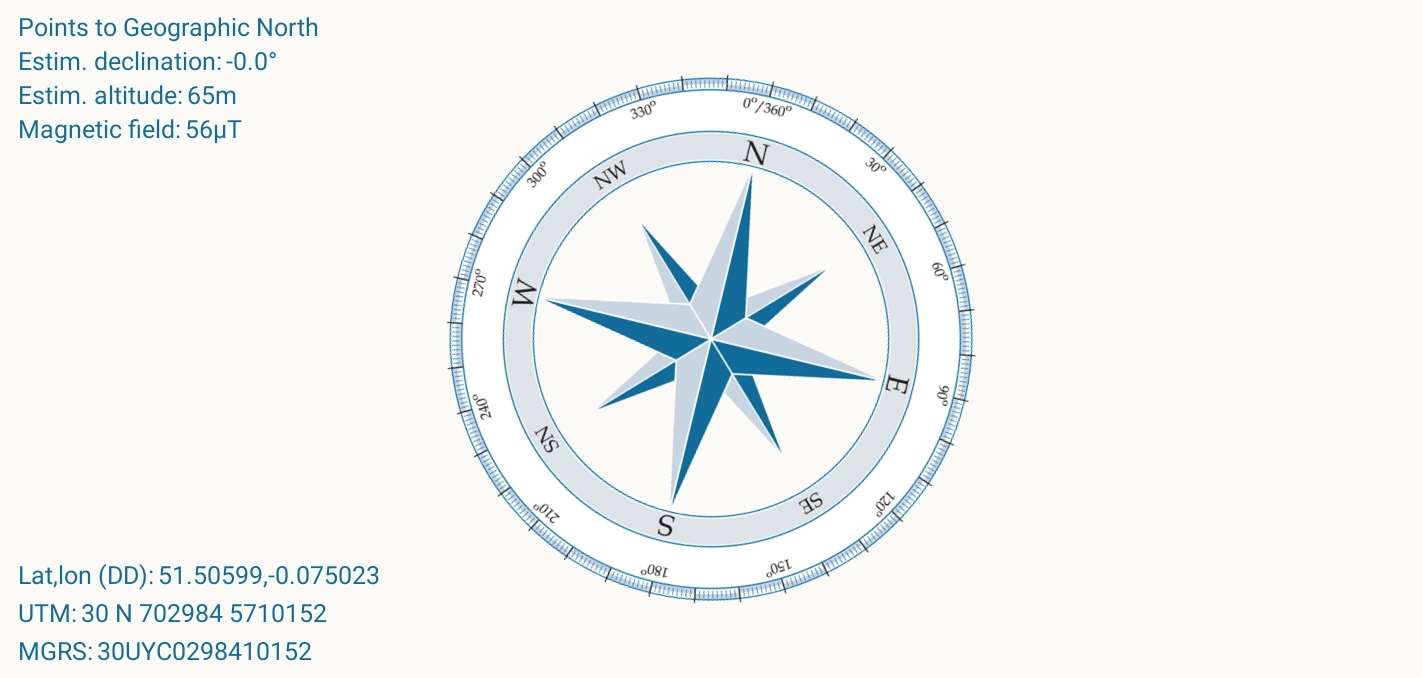
The compass either indicates true north (TN) or magnetic north (MN) – the latter in case the device fails to determine the declination for your location.
Remarkably, the declination figure of 0.0° determined for London in the screenshot above was indeed accurate in 2019.
The coordinates displayed are based on WGS84.
There is an indicator providing the magnetic field strength; an alert is triggered when the sensors becomes unstable, in which case a manual calibration would be required so as to provide accurate compass readings (instructions on how to achieve that will be provided on screen – mostly about turning your device upside down a couple times).
You can switch between compass views by pressing on the compass picture.
The Extras button on the Dashboard offers the following choice of menu items:
- Switch Theme – modifies the look and feel of the Dashboard (same as pressing on the LockOnMe logo)
- Public Targets – shortcut equivalent to opening the Tracking Management System screen, clicking on Add... and then choosing Target: select among Public Targets
You get presented with a public list of existing targets which are openly available for tracking. See lockon.me/publictargets for more details.
 - User Guide – opens up the present page in a web browser
- Contact – opens up the contact page in a web browser
- Intro slider – brings about the introduction presentation which get displayed when launching the app for the first time
DTMF, which stands for Dual-Tone Multi Frequency, is a telecommunications signaling system most famously used for sending information over the phone by pressing on the keypads. Each keypad is assigned two specific audio tones (frequencies) to be generated simultaneously; in turn, DTMF frequencies are detected from the audio source and transcrited into keys by a Goertzel algorithm.
LockOnMe uses DTMF tones to generate an audio signal containing either target details or fixed positions, which the recipient's LockOnMe app can process.
The most appropriate use case for this [experimental] method of sharing positions is with radio transceivers (which can be as basic as walkie talkies), to exchange information in conditions when the internet signal is not viable, and/or without having to read one's position or target details out loud.
It will not work just by using 1 device to either transmit or receive, as on the one hand, the sound generated by a smartphone cannot be transmitted on a call (even with the sound coming from its loudspeaker), and on the other hand, on the receiving end, a smartphone cannot generate a sound and process it at the same time via the microphone. So, both transmission & reception each require two separate devices (for transmission one to generate the signal and another close by to transmit it on a call, and for reception one to receive and diffuse it on loudspeaker, and another close by to listen to and process the signal).
For "show", you could use Wear OS smartwatches with LockOnMe installed, in addition to your phones: the sender would generate the audio signal from his smartwatch for example and transmit it on his phone, while the receiver would have for example his phone on loudspeaker and get his smartwatch to process the DTMF signal.
To experiment on your own, you could just generate the audio signal on a separate phone or smartwatch close by, and use your phone to process it.
You can get LockOnMe to generate a DTMF signal from the Position Service, Connected Target or Tracking Management System screens, via the share/send buttons, or by long-pressing on any element from the tracking list.
Upon selecting the DTMF method of sharing, the DTMF Generation screen will be displayed:
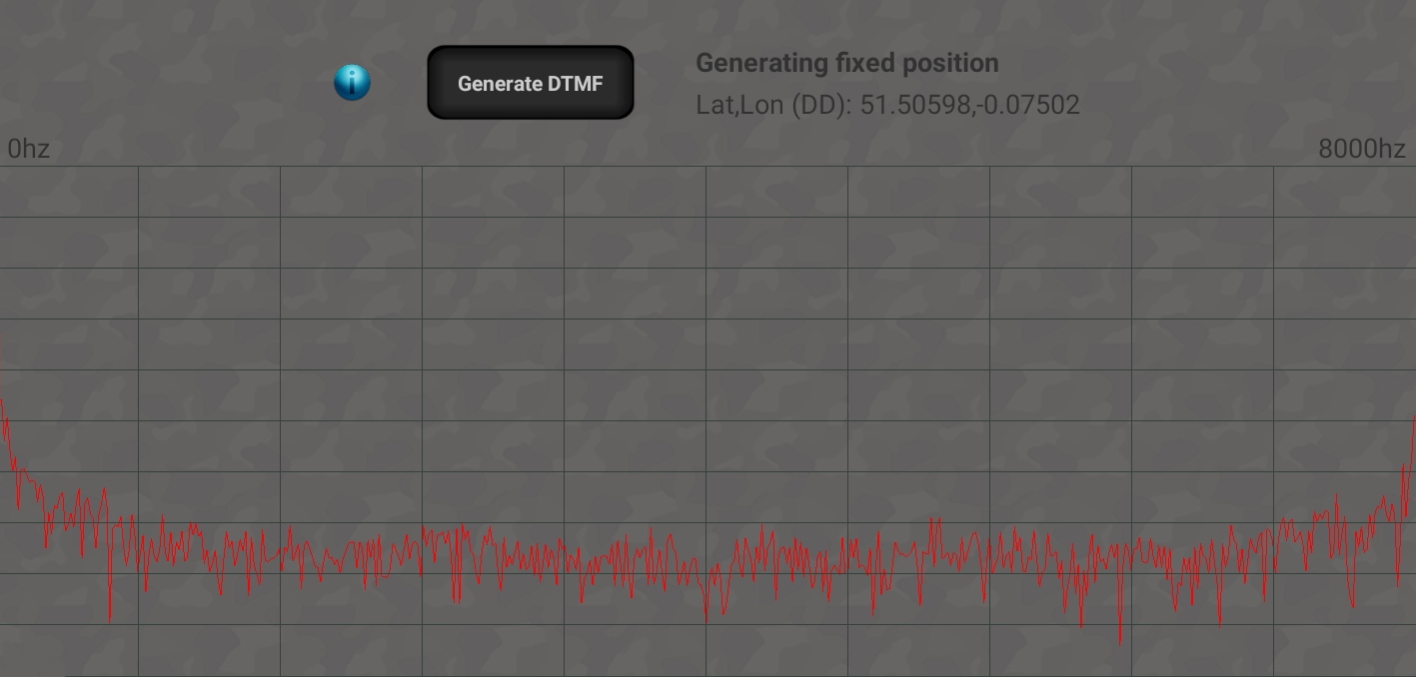
- trigger the sound on one device's loudspeaker at high volume
- hold the radio transceiver's (or separate phone's or watch's) mic less than 1 inch from the speaker (yes, THAT close! Microphones are NOT sensitive, so as to block the wind, etc.)
- alternatively, consider using a specialist cable connecting the transceiver to your phone
In order to detect a DTMF signal, go to the Transmission screen, click on Add Target and select "Import from DTMF signal", which will bring out the DTMF Detection screen:
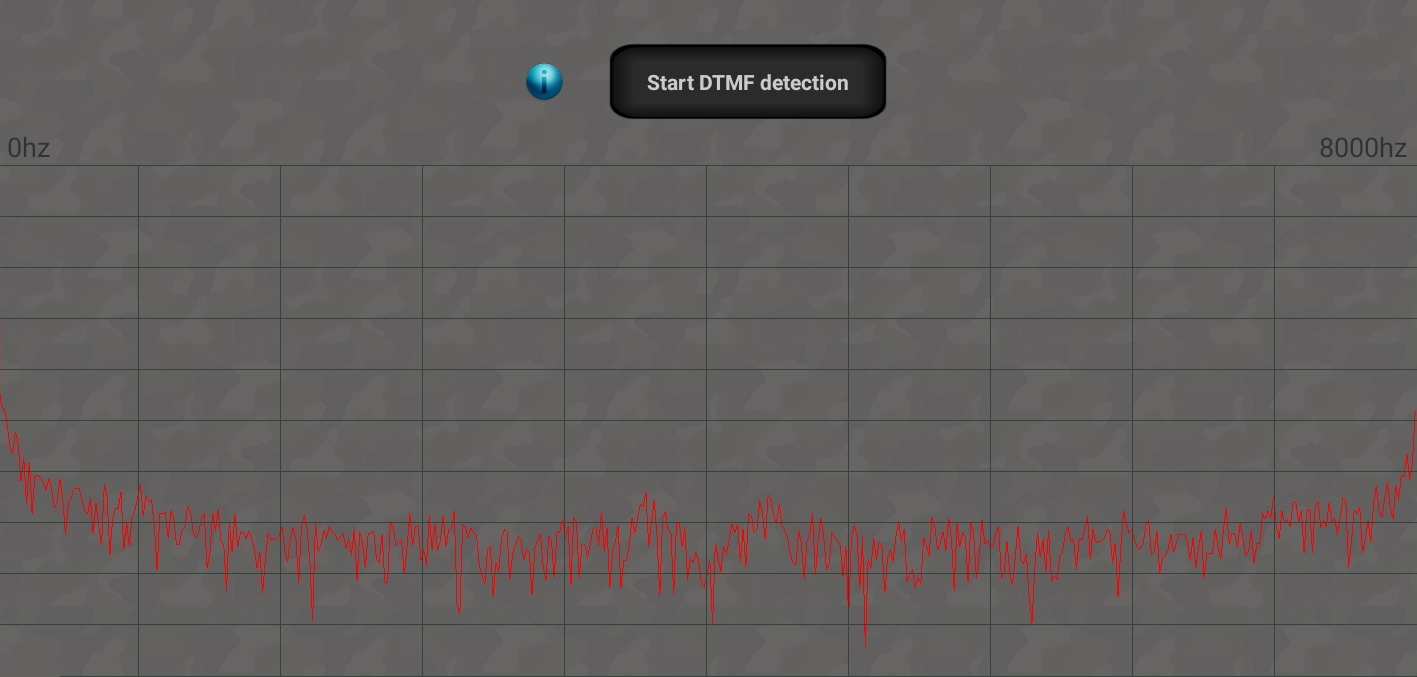
- the incoming DTMF signal should come loud and clear (neither faint, nor distorted) out of one device's loudspeaker
- hold the separate device's mic a few inches from the speaker
- alternatively, use a specialist cable
Start DTMF detection opens up a detection window lasting 7 seconds, during which LockOnMe waits for the signal starter tone; if it "hooks" it, it then processes the signal until the termination tone or until 15 seconds have elapsed, whichever comes first.


